One-Skein One-Der: The pattern
Big thanks to Jan, who edited the pattern for me into proper crochet-speak, and to Jill who tested it for me as we scribbled down various

annotations :-)
Materials
One skein Koigu KPPM (50g/175yds)
3.5mm crochet hook
Abbreviations (English terms used)
ch – chain; sp – space; tr – treble; dc – double crochet; dtr – double treble; slst – slip stitch.
Instructions
Mesh:
Make 32 ch
Row 1: 1tr into 7th ch from hook, *ch 2, skip 2 ch, 1tr into next ch* repeat from * to * 7 more times. (nine spaces)
Row 2: Make 5 ch (turning ch), *1tr into next ch sp, ch 2* repeat from * to * seven times, 1 tr into top of turning ch.
Repeat row 2 until scarf is about 1m long, or you have about a ping-pong ball size worth of yarn left.
Ruffle:
Tip: Work ruffle at foundation edge first, then if you think you are likely to run out of yarn unpull a few rows of the mesh before working second ruffle.
Join yarn at corner and work ruffle along short end of scarf.
Row 1: Make 5 ch (turning ch), [1dtr into first ch sp, 1 ch] 3times, *[1dtr into next ch sp, 1 ch] 4 times* repeat from * to * for each remaining space, omitting final ch.
Row 2: Make 5 ch (turning ch), [1 dtr, 1 ch] into each ch sp to end, 1 dtr into top of turning ch.
Row 3: [4 ch, 1 dc] into each ch sp to end, 4 ch, slst into top of turning ch. Break yarn and draw through last loop.
Repeat ruffle at other end, darn in ends. Scarf will increase in length with blocking.
Labels: Patterns
Hooked
A long chain (sorry) of events yesterday all seemed to flow towards one ultimate conclusion - I crocheted a scarf.
It started with the arrival in the shop of Jan Eaton, author of several
crochet and knitting books and unofficial crochet expert at
Stash on a Saturday. She had been clearing out and had brought along for our classroom a pile of bits and pieces including a bag of crochet hooks.
A customer came in and happened to ask me about a technique from one of Jan's books, I waved her in Jan's direction and then furtively followed behind so I could listen in.
I then decided that I really had to unpull the one-skein sample scarf I'd made in Koigu as I never really liked it - any excuse to play with Koigu - and decided maybe I could crochet it this time. A bit of help from the expert and I was on my way.
See how it's coming together?... It may have ended there except that we were visiting Neil's sister for the afternoon and since she was confined to the flat after a knee reconstruction so were we for the duration of the visit. Afternoon became evening and pizza and I crocheted happily away through Star Trek and kitten-watching. Until suddenly I was almost out of yarn.
"Um... can I borrow your internet for a minute?" google 'crochet ruffle edgings', back to the couch.
Meanwhile, Neil was itching to get back to his computer (the kitten was asleep and the movie over and he didn't have any Koigu to play with) so I agreed to leave. Due to dodgy weekend tube service I finished the ruffles on the train and darned in the ends while waiting for a change. Blocked last night and thanks to the heating which we can't seem to turn down, dry this morning.
And here it is: The One-day One-skein One-der

Sometime I'll have a go at crochet pattern language and try and write it up for you :-)
Ciao!
Labels: Finished Objects, Patterns
Cafe Curtains

I’m finding it very difficult to photograph these socks effectively so you’ll just have to trust me. The lace pattern is very easy, and looks just a little like café curtains pulled back prettily on either side of a window.
Yarn
Lorna’s Laces Shepherd Sock, shown in colour ‘Lakeview’. I used one skein for small socks with a shortish cuff, allow two if you want longer socks.
Gauge9 sts/inch in stocking stitch
Abbreviationsyf – yarn forward as if to purl; yb – yarn back as if to knit; yo – yarn over; ssk – slip next two stitches kwise, return to left needle and k2tog through back loops;
PatternLace pattern is worked over 8 stitches and 8 rounds.
Round 1 and all odd rounds: *k7, p1* rpt to end
Round 2: *k2tog, k2, yo, k1, yo, ssk, p1* rpt to end
Round 4: *k2tog, k1, yo, k4, p1* rpt to end
Round 6: *k2tog, yo, k1, yo, k2, ssk, p1* rpt to end
Round 8: *k4, yo, k1, ssk, p1* rpt to end
InstructionsCast on 64 stitches and join into the round, being careful not to twist.
Work p2, k2 rib for 8 rounds.
Commence pattern, work 8 rows of patt rpt 5 times or until cuff is desired length.
Work heel over next 32 stitches, placing remaining stitches on holder or spare needles.
Each yf or yb at the beginning of a row creates a yarn-over pair. These are knitted together at the end of the short rows to create a neat finish without holes.
HeelRow 1: k to last stitch, turn
Row 2: yb p1, p to last stitch, turn
Row 3: yf k1, k to next yo pair, turn
Row 4: yb p1, p to next yo pair, turn
Repeat rows 3 and 4 until 11 stitches remain between the yo pairs.
To complete heel:
Row 1: yf k1, k to next yo pair, k 1st stitch of pair, slip next yo pwise and slip first stitch of next pair kwise, return slipped stitches to left needle and k2togtbl
Row 2: yb p1, p to next yo pair, p 1st stitch of pair, p2tog (next yo and 1st stitch of next pair)
Row 3: yf k1, k to next yo pair, k 1st stitch of pair, slip next 2 yos pwise and slip first stitch of next pair kwise, return slipped stitches to left needle and k3togtbl
Row 4: yb p1, p to next yo pair, p 1st stitch of pair, p3tog (next 2 yos and 1st stitch of next pair)
Repeat rows 3 and 4 until the final k3togtbl, there will still be yarn-overs at the other end of the needle.
Recommence working in the round.
Next round: patt 32 sts (top of foot), k3tog, k to last stitch, p1.
Continue working pattern on top of foot and stocking stitch on sole. To balance pattern purl last stitch of sole stiches in each row. Continue until sock is within 2 inches of toe.
ToeWork short-row toe over stitches on top of foot, leaving sole stitches on a holder. Work as for heel until the final k3togtbl, there will still be yarn-overs at the other end of the needle, turn.
Next row: p to last three stitches, p3tog
Break yarn and graft seam using kitchener stitch. Darn in ends.
Labels: Finished Objects, Patterns
Super Cosy Beanie
This hat is thick and warm. Just the thing for the snow or, as I discovered, for keeping the ears warm at the top of
Butte de Lion on a cold winter’s day at Waterloo. Use a soft, chunky yarn and knit it up before the cold catches you!

Yarn requirements: 1 skein Malabrigo (215yd/100g) or Manos Del Uraguay (130yd/100g) worsted weight yarn.
Gauge: 14st/4” in rib, 5 - 5.5mm needles
Size: to fit small-medium women’s head.
Cable stitch: C6F – slip 3 stitches to cable needle and hold in front, knit next 3 stitches, knit 3 stitches from cable needle; C4F - slip 2 stitches to cable needle and hold in front, knit next 2 stitches, knit 2 stitches from cable needle
Pattern
Cast on 84 stitches.
Ribbing: k2, p2 each round for 6 rounds.
Begin patt
R 1 and all odd rounds: *k6, p1, k1, p1, k1, p2, rept from * to end of round
R 2: *k6, p2, k1, p1, k1, p1, rept from * to end of round
R 4: *C6F, p2, k1, p1, k1, p1, rept from * to end of round
R 6 and 8: as for R 2.
Repeat these 8 rounds until hat measures approx 5”, finishing with R 3.
Crown
R 4: *C6F, p2, k1, p1, p2tog, rept from * to end of round (77 sts)
R 5: *k6, p1, k1, p1, k1, p1, rept from * to end of round
R 6: *k6, p2, k1, p2tog, rept from * to end of round (70 sts)
R 7: *k6, p1, k1, p2, rept from * to end of round
R 8: *k3, k2tog, k1, p2, k1, p1, rept from * to end of round (63 sts)
R 9: *k5, p1, k1, p2, rept from * to end of round
R 10: *k2, k2tog, k1, p2, k1, p1, rept from * to end of round (56 sts)
R 11: *k4, p1, k1, p2, rept from * to end of round
R 12: *C4F, p2, p2tog, rept from * to end of round (49 sts)
R 13: *k4, p1, k1, p1, rept from * to end of round
R 14: *k4, p1, p2tog rept from * to end of round (42 sts)
R 15: *k4, p2, rept from * to end of round
R 16: *k4, p2tog, rept from * to end of round (35 sts)
R 17: *k4, p1, rept from * to end of round
NB: To achieve neat decrease pattern on last few rounds, end of round will shift each time.
R 18: k4, k2tog, *k3, k2tog, rept from * to end of round (28 sts)
R 19: k
R 20: k3, k2tog, *k2, k2tog, rept from * to end of round (21 sts)
R 21: k2, k2tog, *k1, k2tog, rept from * to end of round (14 sts)
R 22: k1, then k2tog around (7 sts)
Break yarn and draw end through remaining stitches. Darn in ends.
Labels: Finished Objects, Patterns
Sock-Sized Knitting Bag Pattern
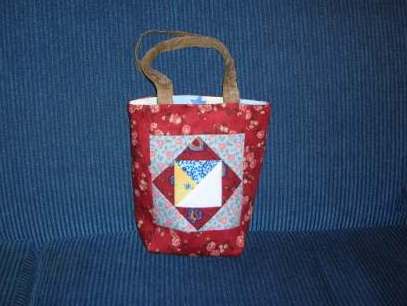
This little bag is the perfect size for a sock-on-the-go. Make it a bit bigger if you like for larger projects.
Materials:
30cm – 50cm main fabric, or assorted scraps for bag and handles
30cm – 50cm fabric for lining
Interfacing or thin batting recommended for larger sizes
Cut Fabric:
¼” seam allowance included throughout
(Measurements given for sock bag, refer to table below for larger sizes.)
From main fabric:
Two 8” squares for front and back, incorporating patchwork or embroidered design if desired.
One 5” x 3 ½” rectangle for base
Two 12” x 2” strips for handles
From lining fabric:
Two 8” squares for front and back
One 5” x 3 ½” rectangle for base
(If using batting or interfacing cut as for lining and attach to lining before sewing up)
Method:
1. With right sides facing, stitch outer base to outer front and back centring at lower edge. Stitch side seams.
2. Fold bag so side seam aligns with base and stitch diagonal seams to make bag corners.
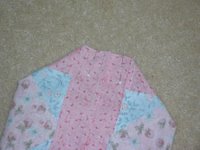
3. Repeat for lining leaving a 3” gap in one side seam to turn through later.
4. Stitch handles into two tubes, turn through and press flat.
5. Turn bag right side out, pin handles in position on sides of bag, matching raw edges and being careful not to twist.
6. With lining inside out, place bag inside lining and stitch top edge seam, securing handles as part of seam.
7. Turn through gap in lining side seam, slipstitch closed and press top edge seam, topstitch if desired (recommended for bags with interfacing or batting).
Fabric measurements for larger sizes (¼” seam allowance included):
Size/Sides/Base/Handles/Finished heightSock/8” x 8”/5” x 3 ½” /12” x 2”/7 ½ inches
Medium/10” x 10”/6” x 4 ½” /15” x 3” /9 ½ inches
Large/12” x 12”/7” x 5 ½” /18” x 4”/11 ½ inches
Labels: Patterns
Basketweave Socks Pattern

This pattern is a great way to use up leftover sock yarn. Knitted toe up with short rows heel and toe. Team with matching basketweave beanie for a cosy bub!
Size: Newborn – 3 months
Materials: Small amount sock yarn, one set double-pointed needles or two circular needles to achieve gauge.
Gauge: 7st per inch in stocking st
ToeUsing waste yarn and crochet cast on, CO 16st, join main yarn
Row 1: P all stsRow 2: k15, turn Row 3: yo, p14, turn Row 4: yo, k13, turnContinue in this manner until: yo, p6, turn Next row: yo, k5, untwist next st (yo from previous row), k2tog (yo has been knit tog with next st on needle), turn Next row: yo, p6, p2tog, turnNext row: yo, k7, untwist next 2 yos, k3tog (2 yos and next st), turnNext row: yo, p8, p3tog, turnWork as for previous two rows, working each row 1 st longer than the last until: yo, k14, untwist next 2 sts, k3tog
Remove crochet chain from CO and place resulting 15 live sts on needle, k these sts, m1
Next row (working in the round): k3tog (last 2 yo and next st), knit to end of round, 32 st
Instep
R1 and 2: k1, (p2, k2) 3 times, p2, k17
R3 and 4: k
R5 and 6: k1, (k2, p2) 3 times, k19
R7 and 8: k
Repeat rounds 1-7 once more, pattern forms on top of foot while the underneath is stocking st.
R8: k31, turn
Heel
Work short rows as for toe on 16 stitches until: yo, k14, untwist next 2 sts, k3tog
Recommence working in the round
Cuff
R1: k1, (p2, k2) 3 times, p2, k1, k3tog, (p2, k2) 3 times, p2, k1
R2: k1, (p2, k2) 7 times, p2, k1
R3 and 4: k
R5 and 6: p1, (k2, p2) 7 times, k2, p1
R7 and 8: k
R9 and 10: k1, (p2, k2) 7 times, p2, k1
R11 and 12: k
R13 and 14: p1, (k2, p2) 7 times, k2, p1
R15 and 16: k
RibbingWork eight rows
Rib: k1, (p2, k2) 7 times, p2, k1
Bind off, darn in ends.
Labels: Patterns
Basketweave Beanie Pattern

This pattern is a great way to use up leftover sock yarn. It is knitted down from the crown and the basketweave pattern is incorporated into the crown increases to create an interesting effect. Team with matching basketweave socks for a cosy bub!
Size: Newborn – 3 months
Materials: Small amount sock yarn, one set double-pointed needles or two circular needles to achieve gauge, 8 stitch markers (optional)
Gauge: 7st per inch in stocking st
StemCO 4st using one circular or 2 dpns
R1: k4
R2: without turning work, slide stitches to other end of needle and k4
Repeat for 8 rows or until desired length
Crown 
R1: inc in each st (knit into front and back of st), divide sts between circulars or dpns and commence knitting in the round (8 st)
R2: k
R3: inc in each st (16 st)
R4: k
R5: *place marker (optional), k1, inc in next st, rpt from* to end (24 st)
R6: *k2, p1, rpt from* to end
R7: *k2, inc purlwise in next st (change twist in next st, purl into back and front of st) rpt from* to end (32 st)
R8: *k2, p2, rpt from* to end
R9: *k3, inc in next st, rpt from* to end (40 st)
R10: k
R11: *k2, p2, inc in next st, rpt from* to end (48 st)
R12: *k2, p2, k2, rpt to end
R13: *k5, inc in next st, rpt from* to end (56 st)
R14: k
R15: *k4, p2, inc in next st, rpt from* to end (64 st)
R16: *k4, p2, k2, rpt from* to end
R17: *k7, inc in next st, rpt from* to end (72 st)
R18: k
R19: *(k2, p2) twice, inc in next st, rpt from* to end (80 st)
R20: *(k2, p2) twice, k2, rpt from* to end
R21: *k9, inc in next st, rpt from* to end (88 st)
R22: k
R23: *k2, (k2, p2) twice, inc in next st, rpt from* to end (96 st)
R24: *k2, (k2, p2) twice, k2, rpt from* to end
Commence PatternR1 and 2: k, remove markers leaving one to mark beginning of round
R3 and 4: * k2, p2, rpt from* to end
R5 and 6: k
R7 and 8: * p2, k2, rpt from* to end
Repeat these 8 rounds until work measures 6cm from beginning of pattern section, finishing with R2.
Band
Work k2, p2 rib for desired length, bind off and darn in ends
Labels: Patterns
Antique Rose Socks
Materials:
50g of Live 2 Knit Elizabeth yarn
 Gauge:
7 stitches, 9 rows = 1 inch in stocking stitch
Pattern:
Toe
Using waste yarn and crochet cast on, cast on 24 st.
Row 1: P all sts.
Row 2: K23, turn work.
Row 3: Yo, p22, turn work.
Row 4: Yo, k21, turn work.
Continue in this manner until: Yo, p10, turn work
Next row:Yo, k9, untwist next st (yo from previous row), k2tog (yo has been knit tog with next st on needle), turn work.
Next row:Yo, p10, sl next 2 sts knitwise, one at a time, to right needle, sl these sts back to left needle and p2tog tbl, turn work.
Next row:Yo, k11, untwist next 2 sts, k3tog, turn work.
Next row:Yo, p12, sl next 3 sts knitwise, one at a time, to right needle, sl these sts back to left needle and p3tog tbl, turn work.
Work as for previous two rows, working each row 1 st longer than the last.Until: Yo, k22, untwist next 2 sts, k3tog.
Remove crochet chain from CO and place resulting 23 live sts on needle, k these sts, m1.
Next row: k3tog (last 2 yo), knit to end of round, 48 st.
Commence patternThere are two repeats of the lace pattern on the top of the foot, the sole is knitted in stocking stitch.
Row 1-3: knit
Row 4: *(k2tog) twice, (yo, k1) four times, (ssk) twice* rpt once for top of foot. For sole of foot k24.
Repeat these four rows until foot is two inches less than length of foot sole.
HeelWorking only on the 24 stitches of the sole of the sock, shape heel using short rows as for toe beginning at row 2.
CuffContinue working 12 sts of pattern over 48st of round for a further 4 pattern rpts (16 rows) Next row: knit around
Picot edging 
Cast off 2 sts purl-wise. *Slip remaining stitch back onto left needle, cast on 1 st , cast off 3 stitches purl-wise, repeat from * to end of round. Darn in ends.
Labels: Finished Objects, Patterns
 annotations :-)